It all started with a Medium post. Quartz Composer, long rumored to be a favorite tool of Mike Matas' to prototype UIs in, got some quick time in the spotlight when it was mentioned as an essential tool for concepting out Facebook Home. This mention, while pretty casual in the article, actually sparked a lot of interest in Quartz Composer as an interaction design tool. The problem was, there are almost no resources out there to help you get started, and Quartz Composer is notoriously difficult to get started with.
Luckily, Dave O'Brien took it upon himself to rectify the situation. In a serious of wonderful tutorial videos, he walks through the process of how he would make a Facebook Home prototype in QC, and teaches you the basics of how the program works along the way. Finally, amidst a sea of un-information regarding Quartz Composer, Dave gave us our small remote island paradise. If you're truly interested in learning how QC works and how it can be used for interactions, I highly suggest watching all 10 videos in his Facebook Home series from start to finish.
Being the masochist that I am, I decided to take on learning Quartz Composer myself, and Dave's videos were indispensible. However, I also picked up some key insights along the way in addition to everything in the videos, and I figured it would be helpful to share those to try to fill in the gap of knowledge that exists online regarding Quartz Composer. This isn't meant to be an exhaustive overview for learning QC, for that make sure to watch Dave's videos. But if those videos left you thirsty for more, read on.
Pixels vs. Units
One of the first challenges I ran into almost immediately after throwing together my first few patches was QC's native units system. By default, QC doesn't know about pixels: everything is relative to a cartesian coordinate system that goes from -1 to 1 on both the X and Y axes.
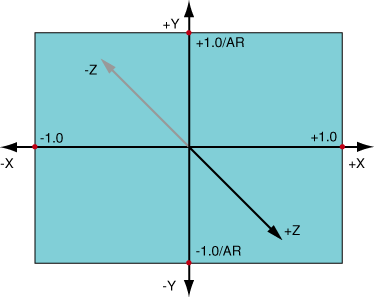
This is great if you're making VJ visualizations that need to be rendered at arbitrary sizes, but it plays hell with pixel compositions you might be getting out of Photoshop. With a bit of elbow grease you can force QC to recognize pixel units and render everything at its native size, but it comes with a bit of complexity and a couple pitfalls you need to be aware of which we'll get to in a bit. If you're using a Billboard1 to render out your image, bring up the Settings Inspector for it (⌘+2) and select "Real Size" for the Dimensions mode.
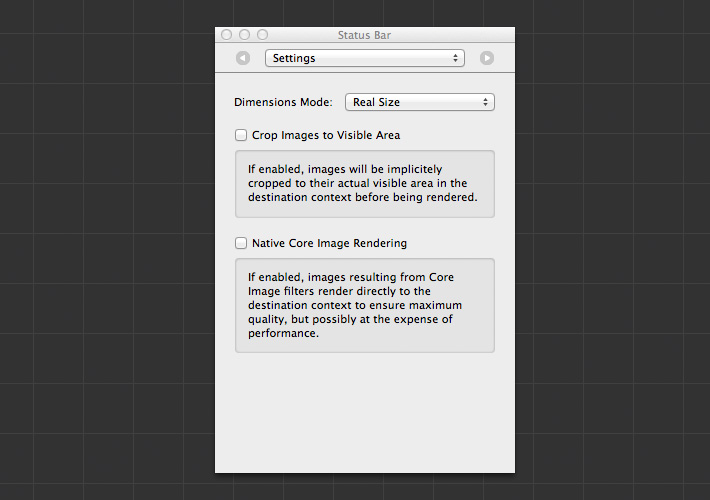
You should now see your image rendered at its actual pixel dimensions within your composition. However, if you try to change its X and Y values, you'll notice it still takes values in Units, between -1 and 1. What we need to do is take pixel values and convert them to units, and luckily there's a patch for that called Pixels to Units (as well as its opposite, Units to Pixels). Add this patch to your document and connect its Output to the X Input of your Billboard, and then do the same for Y. Now, if you set a pixel value on the Pixels to Units patch, you'll see that this value is converted to QC's native units and applied to the Billboard. Success!
However, as I mentioned before, there are a few pitfalls you need to be aware of and avoid. There is no global conversion to pixels for your composition, you have to do it yourself everywhere you need it, which means you need to keep track of when you're setting things in pixels and when you're setting things in units. By default, unless you're running something through the Pixels to Units patch, everything in QC expects units. So, if you're doing a calculation on a pixel value in another patch, remember to convert it back to a Unit before connecting it to another patche's Input that expects units, such as X, Y, Width, or Height in a Billboard or Sprite. It's best to think about the Pixels to Units patch as a convenience for yourself as a creator, and to just always convert everything back to units once you actually interact with other QC patches.
Keep it DRY
If by now you're thinking it's going to be really annoying to constantly convert pixels to units every time you want to move a Billboard or Sprite around the screen, then you're absolutely right. That's why, whenever possible, you should use a concept well-known by programmers: DRY, Don't Repeat Yourself. One of the easiest ways to do this is to build yourself a macro patch that handles a common situation you'll be running into a lot. For example, here's a macro patch I made called Pixel Sprite, which takes some common properties I use a lot and exposes them for easy use.
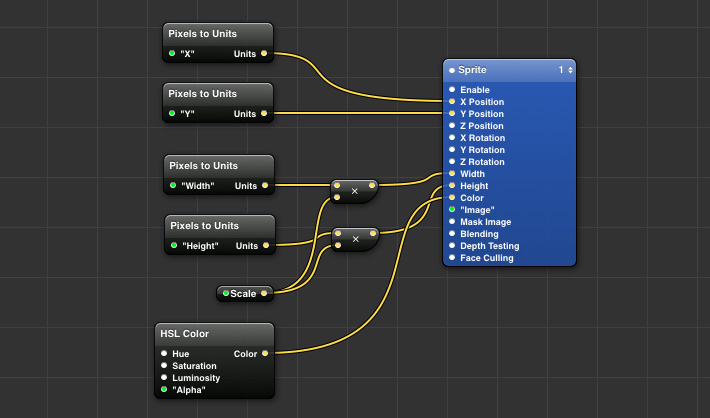
For this macro patch, I've gone ahead and exposed the Inputs for X, Y, Width, and Height in pixels, as well as Alpha and a custom Scale calculation. What's nice about this is now I can expose those properties both through the Input Parameters pane and as Inputs to be modified, as you can see below.
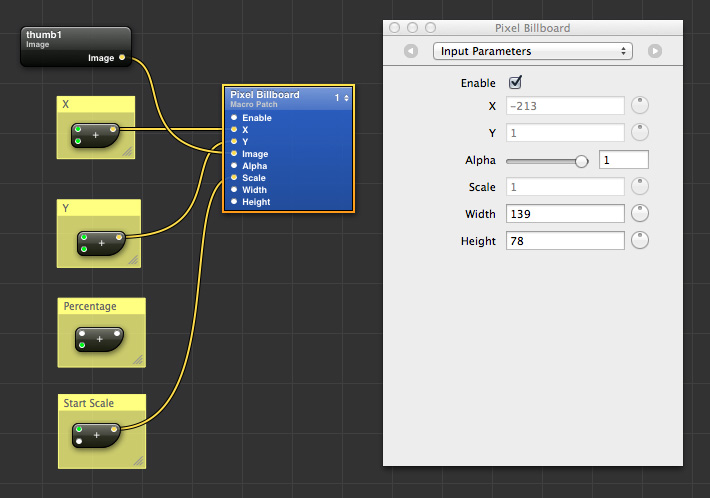
Just remember the caveats from above: your macro patch is expecting values in pixels for X, Y, Width, and Height, so make sure to use that Units to Pixels patch if the output you're getting from another patch is in units (which it would be by default).
The JavaScript Patch
In my opinion, this is the most powerful patch in all of Quartz Composer and is where everything finally "clicked" for me. While the node-based approach to Quartz Composer is alien to a person used to thinking programmatically, like myself, the JavaScript patch felt like home. Why is this patch so important? Quite simply, you can perform an almost unlimited number of computations on an input and have a calculated output. Going through everything you can do with this patch is beyond the scope of this blog post, but I'll at least give you a taste of things you can do to give you some ideas on when you would want to use it.
The first concept to wrap our heads around with the JavaScript patch is how you get values in and out of it. When you first add it to your composition, you'll notice it has two inputs and one output (we'll get to how to change these later). Bring up the Settings Inspector (⌘+2) for the patch, and you'll see where you can start writing your JavaScript code. Most of the code you'll write goes inside the main function declaration that you see already written in the patch. The inputs are accessed via the inputNumber object declared in the function, with code like this:
var myFirstInput = inputNumber[0];
var mySecondInput = inputNumber[1];
You don't have to store them in separate variables, you can change them directly. This is just a silly example to give you an idea of how it works. Next, how do you change what comes out of the patch as an output? We simply create a result object, set the property to contain the output we need, and return it in the main function. In this case, our output is called outputNumber:
var result = new Object();
result.outputNumber = inputNumber[0] + inputNumber[1];
return result;
That's it! You should now be taking 2 inputs, acting upon them in some way (the example just adds them together), and then returning an output. But what if you want more than just 2 inputs, or more than just one output? That's where the function declaration I mentioned in the beginning comes into play:
function (__number outputNumber) main (__number inputNumber[2])There are 3 parts to this declaration that are very important. The first, is the __number part that precedes both the input and out numbers. As explained in the comment above the function, those are special indicators which allow you to specify what Type your inputs and outputs should have. They can be booleans, strings, numbers, etc. If you want it to be any kind of input or output, you can set it to __virtual. The next two important areas are outputNumber and inputNumber. These are objects that control how values are funneled in to and out of your patch. Want more than one output? Then simply turn the outputNumber object into an array and give it a length, such as outputNumber[2]. Now you should have two outputs show up in your patch, outputNumber[0] and outputNumber[1]. Want to use a different variable for your inputs other than inputNumber? Simply change it. You can even use different variable names instead of an array of objects, and give each a different type, just separate them with a comma:
function (__number resultingValue, __boolean hasBeenSet) main (__number xPosition, __number yPosition)
{
    var result = new Object();

    //Output the X position plus the Y position
    result.resultingValue = xPosition + yPosition;
    //Set to true
    result.hasBeenSet = true;

    return result;
}
You'll see your JavaScript patch has been updated to reflect how your variables were declared:

Put all of this together, and you can combine the functionality of 10 different patches all in one code block of logic, and with things like code comments, have it be 100 times clearer.
Miscellaneous Useful Patches
Grouping Patches Into a 3D Transform
If you have a few elements that you want to move as a group, such as a grid of thumbnails where each thumb is its own Billboard, then the 3D Transformation patch is for you. Simply add it to your composition, grab all of patches together you want being transformed as a single unit, and place them into the 3D Transformation patch. Now, when you act upon the X and Y of the 3D Transformation (remember, by default this is in units, not pixels!!!), it'll move all of the elements inside it together. And, if you expose some extra Inputs from inside the patch, you can even act upon both the 3D Transformation and each sub-patch's X and Y values at the same time, giving you some interesting results.
Input Splitters
Along the lines of the DRY principles. sometimes you have what some call "magic numbers", which are really just static values that happen to work for your current composition, such as an X or Y position of a specific element. If you only need to use this number once, then it's fine to just enter it directly into the Input Parameters palette and be done with it. However, if you want to use it multiple locations or you want to publish that Input so it can be used by the parent patch, then you should look into Input Splitters. Here's an example of using them to store arbitrary values
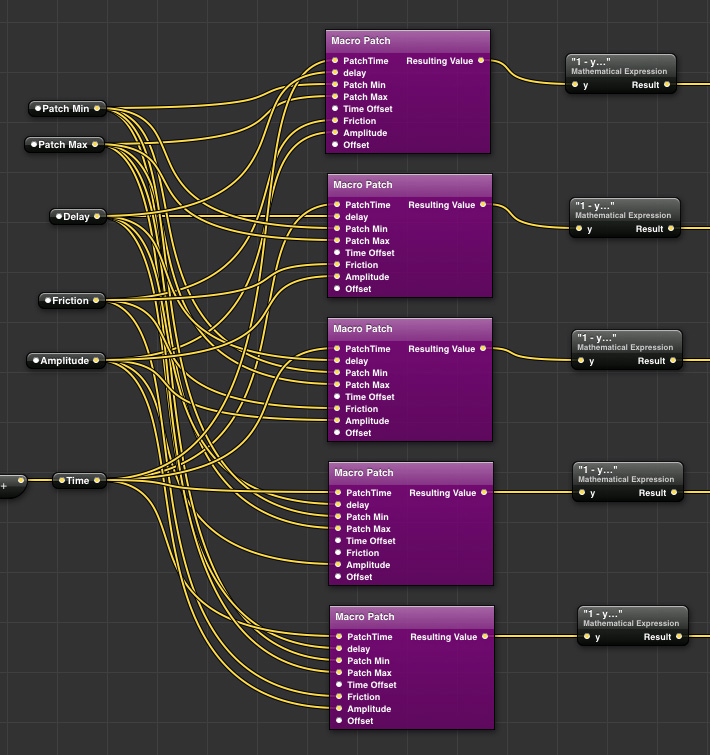
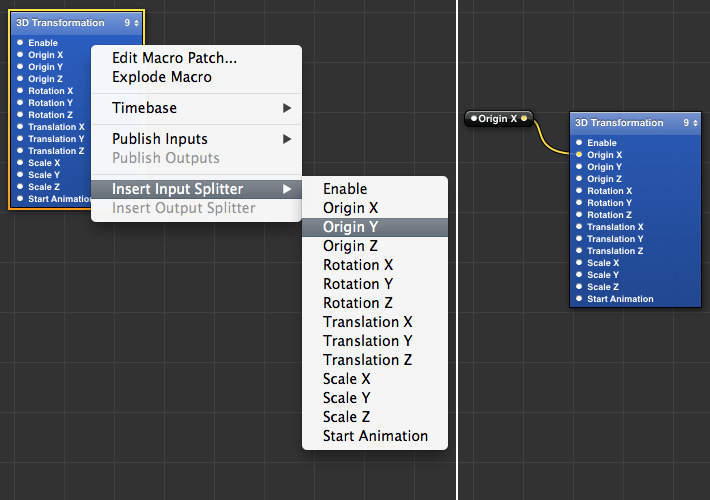
As you can see, each of the purple patches take a value as an Input. For a lot of those values, they all need to be the same. Instead of clicking on each individual macro patch every time I want to change something like Amplitude, Friction, or Time, I've instead added an Input Splitter, connected it to each macro patch, and now I have one place where I can change the value of that for all of the macro patches at once. Just make sure to go into the Settings Inspector for the splitter (⌘+2) and change the Type from Virtual to whatever type you need (in my example, it would be Number). You can also create an Input Splitter from a pre-existing Input by right-clicking on a patch, selecting Insert Input Splitter, and choosing the Input to split. This also works the same for Outputs.
Mathematical Expression
The JavaScript Patch is fantastic, but sometimes it's overkill, especially if what you're doing in JS can be simplified down to a simple mathematical expression. Enter the Mathematical Expression Patch. While limited to just one line of math instead of JavaScript's infinite potential, it does have one great advantage: any variable you insert into the expression automatically becomes available as an Input using the same name you gave the variable. This is a huge advantage over the JS Patch where all the inputs are simply an element of an array, since you can see what the Input is at a glance. Also, not only can you do normal math operations, but it also supports the Min(), Max(), &&, ||, and ! operators. All-in-all, if you just need to compare some values or do simple math, go with this patch over the JavaScript one: it'll save you some headaches later.
Hopefully that's enough to get you started and thinking in the Quartz Composer way. If you had any other questions, feel free to reach out to me on Twitter or App.net, or even better join QC Designers and post your questions there. Good luck!
-
This step only applies to Billboards and not Sprites, since with Sprites you have to supply your own Width and Height values. ↩